Monday 18 November 2013

Almost a month, it's been awhile...

           Well, first of all, a thousand apologies for the lack of posts lately. We've been swamped with projects and orders so even getting in front of a PC to respond to questions takes some careful planning. This one's going to be a short one with some updates of what we've been up to lately.


Superscope BLA-545


          First up is this very rare Superscope amp by Marantz. The owner actually found it at a junk yard and got a good deal on it...actually when he told me how much he paid for it, I was pretty jealous! There was some damage to it, mainly the volume knob had been replaced and the front face plate was broken on the right side. It also had no sound on one channel. The owner got it fixed but it recently developed a fault so he called us up. 


          Before we go any further with this, here's a bit of history on Superscope and the Marantz connection taken from the Audiokarma website forums:

"Saul Marantz sold Marantz to Superscope in 1964. All the classic solid state Marantz gear of the 70's came out under Superscope's ownership. Superscope's claim to fame was that, at the time, they imported all Sony's tape recorders. This is the closest corporate tie that has ever existed between Marantz and Sony.

In any case, Superscope began producing Marantz products in Japan in partnership with Stantard Radio Corp. (SRC) in 1966. Eventually, Superscope would own a 50% stake in SRC. SRC changed its name to Marantz Japan Inc. in 1975 and shortly afterwards was manufacturing all Marantz gear.

In 1980, Superscope sold its interest in Marantz Japan Inc. to Phillips, only retaining rights to the name in North America. Phillips, at the time, was jointly developing the compact disc with Sony, but was a separate company. In the 80's, under Phillips, there was certainly some fine gear produced. Overall though, the quality declined. The schizophrenic appearance of the brand in North America (Superscope silkscreened "Marantz" on some pretty horrid equipment) contributed to the tarnishing of the nameplate in the public perception.

In 1992, things started to turn around. Phillips acquired the North American rights to the brand and set about polishing it. In 2001, Marantz Japan Inc. bought out Phillips' share in the company, consolidating ownership of the brand in one corporate entity for the first time in sixteen years. The following year, Marantz Japan Inc. and Denon were acquired by a Japanese-controlled consortium and D&M Holdings was formed."


Internals very similar to Marantz 1050 / 1072 amplifiers


          If you looked inside a Marantz 1050 or 1072 from the 70's and then into a Superscope amp from the same period, you'd be hard pressed to tell the difference. Same goes for this Superscope BLA-545. As much as it says Superscope on the outside, all the boards inside have Marantz printed on them. 


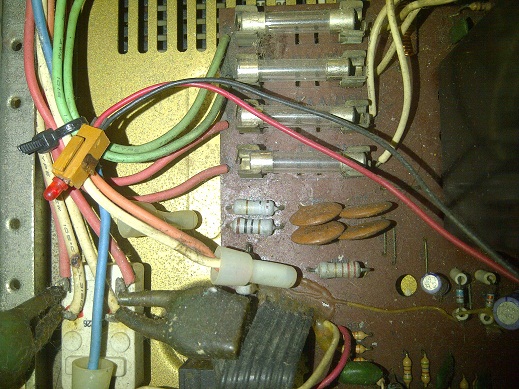
          Anyway, back to the customer's Superscope amp, we discovered a bad speaker cable and we replaced all four cables just to be safe. Because we had the amp partially stripped down, we recommended a recap as the amp was still on its original capacitors. We also noticed that the amp was drawing a bit more current than it should and a quick check told us that the bias was set very high on one channel. We reset both channels to factory spec. 


          The amp had a lot of dirt on the front, since we already had it partially stripped down, we removed the front panels and gave it a good clean. We suspect that most of the dirt came from the time it sat at the junkyard. All switches and potentiometers were cleaned as well. Most of the time, people think that spraying WD-40 into pots and switches will solve all problems. Unfortunately with very heavy dirt build up, this is a temporary solution. Also we do not recommend WD-40 for switches and pots, in the long run, it can actually do more damage than it helps. A good electronic cleaner spray is the best way but to get it really clean, a total strip down is usually required which is what we do for most older amps. 


          The amp is now ready and should be able to give it's owner quite a few more years of service! 


Carver C-11 pre-amp


          This pre-amp was bought based on a recommendation from us to one of our regular clients. This client has a Carver 5-channel power amp and was using his NAD integrated to control it. We spotted this Carver pre for sale and negotiated a deal on the client's behalf. 


          The client collected the Carver from the seller and was told of an issue with the balance pot. We checked it and found that all it needed was a clean to set right. We recapped the unit and checked every function and found it to be operating within specs. 


          The Carver C-11 is actually an updated version of the Carver C-1. Both pre-amps have a holography feature. Initial tests showed that this function was not working properly on the client's amp. A bit of checking showed that it needed to be re-tuned so we did that and got it working again. Can't say that we're a fan of this feature...in fact it seems to be a gimmick more than anything else. 


          Well, we can't wait to unite this C-11 with that 5-channel power amp and see how it sounds. Before the unit was fixed we tested it against a Naim Nait 5i and even when it wasn't working properly it was way ahead of the Naim in terms of details, sound-staging and bass. Really eager to hear how it sounds now. For those of you saying how can we compare a pre-power combo against an integrated...well, keep in mind that the Naim costs 3 times the price of the Carvers. The Carvers are almost 20 years old and the power amp is actually a home theater power amplifier whereas the Naim is an "all for music" amplifier. Oh ya...and the Carver wasn't actually at 100% when first tested...


          Ok, that's all for now. We're gonna try to keep updating regularly when time permits. We have plans for next year and at the moment its all about implementing those plans. 


Till the next one!

Tuesday 22 October 2013

Black Octagon BOS1X - XLR Interconnects


          This may come as a surprise but we don't just make and sell 3.5mm interconnects. This is the BOS1X XLR Interconnect cable. It comes in a stereo pair at 1.5 meters as standard. We're gonna let one happy customer do the talking as well as a few pics. :) Below is a short write up by Julian who bought a pair;


"This is my second purchase of cables from Black Octagon. 

Product: Black Octagon BOS1X XLR Interconnects

First 10 hours is just sucked.......now.......after running it with cable cookers and playing it for 100 hours.......

Music all there is....frequencies from high to low are balanced.....speed and transient good.....transparency....oh my....this cable did whack some other huge brands flat. My musical stage was extended with this cable.

Cable stays silent even with encounters with power cables and other cables.....some of our other tested cables wasn't as good....


Neutrik NC3MX-B Gold Plated XLR's


Equipments tested on:

Amplifiers: McIntosh MA7000, Audio Research VS110 + SP17 pre, Audio Research DSi200

Sources: McIntosh MCD500, Audio Research Reference CD8, Audio Research CD5

Speakers: Sonus Faber Cremona M, Sonus Faber Amati Anniversary

Interconnnect Cables: Various Brands

Speaker Cables: To maintain the equivalent sonics.....the speaker cable remained the same.....XLO Reference 2

Power filters from Quantum Resonant and power cabling by Nordost Blue Haven


Verdict: So is the BOS1X high-end? In music and sound......YES. How does it perform against top ends like Transparent Reference and MITs? Obviously it doesn't match up, its a different ball game. Transparent brings even more tonal and musicality. But would you go wrong with these BOS1X's? No...you won't....probably regret not getting it. Equipment matching.....so far no issue with different combination of pairings."


Neutrik NC3FXX-B Gold Plated XLR's


          The cables are custom made to order so lead time for a pair will be about 25 days. Burn in period is 100 hours. 


Features:


  • Neutrik gold plated XLR's. 
  • Double Copper Shielding
  • Oxygen Free Copper
  • Terminated with 2% Silver Solder
  • Grey braided sleeving


          The cables are custom made to order so lead time for a pair will be about 25 days. Burn in period is 100 hours. 


Price:

1.5m = RM350.00 / USD$111.06 (based on today's currency conversion)

Customized lengths are available. Lengths refer to the length of the cable before connectors are soldered on. Use the Contact Form on the upper right hand of the screen to ask us for a quote and postage rates to your area.


Postage within Malaysia is via Pos Laju and the rates are as follows:

  • Anywhere in West Malaysia = RM8.00 / USD$2.43
  • Anywhere in East Malaysia = RM10.00 / USD$3.04


Wednesday 16 October 2013

Introducing the BOS5 - Our Latest 3.5mm to 3.5mm Offering


          As of next month, Black Octagon Solutions is a year old. Our very first product was a 3.5mm to 3.5mm interconnect, the BOS1. Seeing the BOS range grow from one cable to 4 different options and also how reliable the cables have been in terms of performance and durability, we've decided to do a couple of things before we turn a year old. 


         First thing is that all our cables now come with a lifetime warranty. The warranty basically is for manufacturing defects. We test every cable made before it leaves the bench so we're confident that they will perform to expectations. 


          The second thing we want to do this month is introduce the BOS5 cable. The BOS5 borrows a bit from our other interconnects instead of just our 3.5mm to 3.5mm interconnects. So it is a completely new cable with a hint of the old stuff thrown in. Here's what we've borrowed:


  • Ultra Pure Oxygen Free Copper from our RCA interconnects and speaker cables for signal transfer and ground.
  • Silver plated Ultra Pure Oxygen Free Copper for signal transfer and ground.
  • Tinned Oxygen Free Copper braided shield like the one in our 3.5mm to RCA interconnect cable. 
  • Switchcraft 3.5HDBAU connectors. Same ones used in the BOS1.
  • Grey sleeving like the original BOS4
  • Starquad configuration
  • 2% Silver Solder 


          Some of you might be thinking that the above features are misleading as it says ultra pure oxygen free copper (UPOFC) for signal transfer and ground as well as silver plated UPOFC for signal transfer and ground. Well, it uses both. Its a starquad cable. Each of the four conductors is made up of strands of UPOFC wire surrounding more strands of silver plated UPOFC wire. Best of both worlds?             


Price:
     
20cm and below = RM135.00 / USD$42.65 (based on today's currency conversion)

Customized lengths are available. Lengths refer to the length of the cable before connectors are soldered on. Use the Contact Form on the upper right hand of the screen to ask us for a quote and postage rates to your area.


Postage within Malaysia is via Pos Laju and the rates are as follows:

  • Anywhere in West Malaysia = RM8.00 / USD$2.43
  • Anywhere in East Malaysia  = RM10.00 / USD$3.04

         
          We'll be updating soon with a new amplifier repair and also what we've been up to. Stay tuned! 

Thursday 10 October 2013

First Week of October 2013, Busy, Busy, Busy!


          Its been awhile since the last update and for good reason. We've been on our toes actually trying to keep up with work and also sorting out the workspace. Also a couple of good personal things came up and had to be taken care of :)

          So here's a very quick update of a small part of what we've been up to: 


Carver AV-405


Carver AV-405 sitting on top of a Kenwood Karaoke amp


          In the picture above there's a Carver AV-405 amplifier sitting on top of a Kenwood Karaoke amplifier. We haven't sorted the Kenwood out yet but the Carver is in the testing stages. Initial complaint from the customer was that it had no sound out of one of the front channels (its a 5-channel amp). When we tested it, we couldn't get the fault to replicate itself. We took it back to the customer's house and set it up the same way he does. Within minutes the sound from one of the front channels began to fade away. 


          We stripped the Carver down, each channel's amplifier is built into a module so dis-assembly was rather easy. Some capacitors were off specifications so we did a small recap. The Carver runs very hot according to the owner so we checked the solder joints and corrected a few dry ones. We also checked the bias on each channel and four of the five channels were very high so we brought them down. Now the Carver runs warm instead of hot. As for the fading sound problem, well, its been running for awhile now without any symptoms. 


Leak Delta 30


Leak Delta 30 DIN speaker connectors


          Next item in for repair was a Leak Delta 30. The owner had lost the original speaker connectors so he had sent it to another shop to get it fixed. The other shop fitted some speaker cables directly to the internals of the Delta 30.


          As you can see from the picture above, there were these big white color speaker cables coming out from the Leak. When we opened the Leak we saw that these were joined to some normal el-cheapo "hi-fi quality" speaker cables on the inside with a heatshrink and some electrical tape. This pink speaker cable was in turn connected to the leak via some screw connectors. Why do people do stupid things like this? We'll never know...


          Anyway to cut a long story short, we had to replace the female 2-pin DIN connectors as one of the pins had broken off and we got a set of male 2-pin DIN connectors for the owner to connect up some speaker cables to use properly with the Leak. Problem solved. 


Yamaha AX-550


          So for some time now we've been trying to get our workspace sorted. We want to separate the cable production from the repair work but with orders and equipment coming in, we couldn't find the time to get our own stuff sorted. 


           Last weekend we put our foot down and got organized. The rack in the picture above (I don't know why the picture is on its side) was bought to get our parts sorted as well as make some space for the equipment to sit instead of it all sitting everywhere. 


          We also bought some test equipment and we're waiting for it to arrive so in the meantime, we're gonna get some equipment here sorted. One of the issues...well, not really an issue but more like a time-waster is that everytime we get a power amplifier in, we need to hook up a pre-amp to test it. Same way when we get a pre-amp, we need to hook up a power amplifier to test it. Enter the Yamaha AX-550.


          We got this Yamaha from one of our regular customers. He didn't want it anymore and insisted we take it for free...couldn't even offer the guy a free cable when he ordered some cables from us. Anyway, the Yamaha had seen a fair share of abuse. Its missing the record selector knob, its feet, a set of its speaker binding posts had been ripped out and it seems to have been opened up and put back together pretty poorly. 


          The Yamaha has a set of pre-outs and main-in connectors on the back which need to be linked with a pair of jumpers for the Yamaha to operate normally. The plan is to first restore the Yamaha which we'll document here as we go along. It definitely needs to be cleaned! 


          We intend to use the pre-outs and main-in connections in conjunction with a patch panel of some sort so we can easily patch in equipment requiring repair easily and also to test out equipment which have been repaired. Hopefully all goes according to plan... Here are a few more pictures of the Yamaha. :)


Till the next update! 


Wednesday 2 October 2013

Repairs: Part 2 - Trade Repairs

          I wanted to talk a bit about trade repairs in this post and how things work around here (Malaysia) and possibly the rest of the world. We do repairs for the trade (re-sellers) and the process is quite simple; they give us a piece of equipment to repair and a budget to work with. Usually these items (equipment) come from one of a few sources:


Second-hand hi-fi galore

  • A customer sent it in to be repaired (these are the best as we aren't usually restricted with a budget and can do the best job possible)
  • A customer sent it in to be sold but the item is faulty and needs to be repaired cheaply so the customer and the re-seller make a healthy profit each.
  • They bought it cheap but there was a fault with it and they need it fixed for cheap before selling it on (these need to be done on a very small budget)
  • It was part of the re-seller's inventory and it developed a fault over time. (it has a set budget so they can make a decent profit selling it once its repaired)


Example

Pioneer SA-500 trade repair


          The amplifier above (a Pioneer SA-500) needed a full re-cap. We normally recommend a re-cap for amplifiers above 10-15 years of age. This Pioneer was over 30 years old and still had all of its original capacitors. The owner intended to sell it so they approached a re-seller in the hopes of getting a fast sale. Unfortunately the Pioneer had not been used in years and did not produce any sound when tested.


          This was where we came in. We checked the amplifier over, recommended a re-cap and a price was agreed upon. Initially we were told to only get the amplifier working and not bother with its phono stage as that would go slightly over budget. In the end we decided that the phono stage should be done as well as its a classic amp and chances are it will be used with a turntable. 


Re-Capped and ready to go


          I'm going to go slightly off topic for a moment to sing the praises of this little Pioneer. It pushes out 12W per channel but with a pair of efficient speakers, this small amp has a very big soundstage! Also this was right off the bat so the capacitors were brand new and had not yet settled in. Expecting it to get a lot better as its used. I was actually a bit disappointed to see it go once we had fixed it to be honest. 


          Well, the above amp is a classic example of a trade repair. The customer ended up getting to sell off a working amp instead of a dead one which meant a bigger sale amount. The re-seller stands a chance to make a bigger profit as well. And as for us...well, we're still waiting for the little amp to be sold as we still haven't gotten paid! Lol...till the next one!


Friday 27 September 2013

Repairs: Part 1 - You Meet Some Nice Ones & Some Others...


          I want to take this opportunity to talk a little about repair work in Malaysia. Over the past week I've conversed via email with the authorized repairer of AVI amplifiers and had a pleasant surprise when I threw a request to one of the leading sub-woofer manufacturers in the UK.


AVI S2000MI


          First up is Phil of P.G. Electronics in the UK. I contacted Phil via email to ask if he had any literature on an AVI S2000 MI integrated amplifier. Unfortunately he couldn't help me there but he did provide a couple of tips on servicing the AVI. Very helpful individual and a brilliant human being overall. By the way, it costs £250-350 to get an AVI S2000 MI up and running in tip top condition from P.G. Electronics. 


          The second pleasant surprise of the week was REL Acoustics. You know REL, those guys who make those earth shattering sub-woofers, yup, those guys. We picked up a REL Q-Bass earlier in the week. This Q-Bass had been "repaired" previously for the princely sum of RM150. It got a new woofer and some major caps according to the owner...but it started cracking if the volume went past half. 


          Opening up the Q-Bass, immediately we gasped at what we saw. The amplifier's main filter capacitors were dangling off the board with wires and those wires had been covered with electrical tape which had already started peeling off. Imagine what would happen if the contacts on those caps were to touch or touch something else on the board! Another issue was the unbranded woofer with no specs on it sitting in place of the original REL unit. 


REL Q-50 Sub-woofer


         A quick check showed that the original unit was no longer in production and also looking at those dangling caps, we didn't believe those were the correct types. Only way to find out was to get a Service Manual. No luck finding one so decided to give it a go and ask REL themselves. They actually replied saying that the Q-Bass was under the old REL management and they too don't have the Service Manual and all they had was the Q-50 and Q-100 manuals which they sent over! Amazing people over there. Unfortunately, the manuals were of not much help as the Q-Bass uses a completely different design to the other Q-series subs. But anyway, kudos to the people at REL.


          Earlier in this blog I said that I wanted to talk a bit about repairs in Malaysia, well, the REL above is an example of the workmanship we sometimes find in equipment we receive. Will expand on this in a different post sometime in the future with a few pictures for examples.


          Well, this is the end of Part 1. In the next post, I hope to touch a bit on trade repairs. Till the next one! 


Tuesday 24 September 2013

System Matching, Reviews, Guides, Ratings, Pros & Cons...Aargh!


          I remember the first hi-fi setup that sat in our living room back in the early 90's. It was a NAD 510 CD player, Denon PMA250III amplifier, Harman Kardon TU930 and a pair of Mordaunt-Short MS20i bookshelf speakers. It was decent, it sounded good and that was it. Then I got into the habit of reading hi-fi reviews and was quite annoyed that most of the equipment I had only garnered 3 or 4 star ratings instead of the highly coveted 5 stars. 


5-stars must mean its good...right?


          What Hi-Fi?, Hi-fi World, Hi-fi Choice, Stereophile...heck, even our local daily; The Sun's Perfect Pitch pullout, any magazine I could get my hands on, I bought and gobbled up everything the reviewers had to say. These guys were gods, they must have had perfect 20-20 hearing (guessing with sound its 20Hz to 20Khz? Haha...)! 


          But then I started to notice something. If two magazines reviewed the same amplifier or speaker, both the reviews would be slightly different or in some cases, worlds apart! One magazine would give it 2 stars and another magazine would give it 4 stars. What's going on here? 


Back to zero. Back to basics. Back to our own ears.


          Fact of the matter is this; the reviews serve as a guide. Nothing more. They do not mean that if you took a 5-star CD player and paired it with a 5-star rated amplifier and speakers, you'll get the best sounding system in the world, it just means that you probably have a slightly better chance of getting an "ok" sounding system. It could sound great but most of the time, it will sound just alright.


          The best judge of any piece of equipment is ourselves, or to be more precise, our very own ears. Not the ears of some person sitting thousands of kilometers away writing about some new piece of gear. End of the day, we are the ones who are going to be sitting down listening to our favorite tunes. 


Yup, those two things sticking out the sides of your head are your best friends


          Forget the number of stars and the bundled discount sets you see advertised. Listen to various pieces of gear, make use of the sales attendant, ask to listen to different combinations. Try listening to two different sets of speakers using the same amplifier. This will give you an indication of the character of that amplifier. Same goes for speakers, sources and everything else in between (cables). Bring along your own CD's for listening. 


A pinch of salt with every opinion is just what the chef ordered


          Ask for opinions but take each one with a pinch of salt. People are biased. They do not intend to be and most would recommend something from the bottom of their hearts but what's dear to them may not be to you so always keep that in mind. Do not get influenced by the latest trends. Set aside a realistic budget. Also list out what you need your system to do and also make notes of what you do not need. Ultimately, there is a system out there with your name on it. 


          The best piece of advice I can give is to enjoy the process. Its a hobby after all. A very satisfying one when you get it right and a very frustrating one which can be very expensive when you get it wrong so take your time. Good luck out there and have fun!


Monday 23 September 2013

The Black Octagon BOS1 3.5mm to 3.5mm Interconnect


The Black Octagon BOS1 Interconnect

          The very first cable to carry the BOS moniker, the BOS1 is a 3.5mm to 3.5mm interconnect. This was the cable that started it all for us but this would be the first time that we are officially introducing it to the market. Reason? We never got round to it to be honest and initially we thought it would be a limited production run. However the response from those who have purchased the cable has been nothing but positive so with some encouragement from our customers, we have decided to make it a permanent fixture in our line of cables.

          Employing a double copper shield like the BOS4, the BOS1 is paired together with Switchcraft 35HDBAU connectors and soldered with WBT4% Silver Solder. Known for being neutral in nature, some may find the BOS1 to be unforgiving within certain systems. Whereas in others, it can be that link which has always been missing. 

          As with all our cables, we believe copper is the best conductor overall and the BOS1 uses oxygen free copper for its two cores and the double shield. 


Switchcraft 35HDBAU 3.5mm connector


Key Features:

  • Switchcraft 35HDBAU 3.5mm connectors on both sides
  • Black braided sleeving to protect the cable and enhance the look
  • Terminated with WBT 4% Silver Solder
  • Double copper shielding for enhanced noise rejection


Black braided sleeving


What Our Customers Have To Say:

"...very good value for money. Neutral sounding..." - Eddy

"...boosts everything compared to the stock interconnect..." - George from Sarawak Malaysia


Switchcraft 35HDBAU in all its glory


Price:

20cm and below = RM135.00 / USD$42.18


Customized lengths are available. Lengths refer to the length of the cable before connectors are soldered on. Use the Contact Form on the upper right hand of the screen to ask us for a quote and postage rates to your area.


Postage within Malaysia is via Pos Laju and the rates are as follows:
  • Anywhere in West Malaysia = RM8.00 / USD$2.43
  • Anywhere in East Malaysia = RM10.00 / USD$3.04


Thursday 19 September 2013

NAD 3020 Rebuild


The 3020 when it first showed up at our doorstep


          The classic (some would say legendary) NAD 3020. This particular example was bought second hand by the owner some time back and came with a few issues. Apparently it had no power LED and there was a slight hum from the speakers when in operation. Well, the hum grew into a massive hum and the owner finally decided to do something about it so he sent it to us.


          A quick visual inspection of the inside showed that the power LED was still there but had become detached from the front panel. The main filter capacitors had been changed to some unbranded ones and the output transistors were also not original. Fuses had been changed to fast blow types instead of the original slow blow fuses. As for the rear of the NAD, besides a layer of dirt and crud, everything looked as it should.


These transistors would have worked in place 
of the  originals, the only problem was that we 
suspected that they were fake.


Fast blow fuses in place of slow blow ones. 
Power LED detached from front panel.


PCB tracks for the output transistors had
been previously damaged.


Tear down


 The 3020's board was removed from its chassis 
and given a good clean.


Output transistors were removed and their 
heatsink was removed for cleaning. All of the old
thermal paste was cleaned off so that the new 
transistors would seat perfectly.


 All switches were cleaned.


Pots were cleaned as well and all found to be 
functioning well.


Assembly


The main filter caps were replaced with 
Panasonic FC caps. New STMicroelectronics
transistors were seated with new thermal 
paste and mica insulators. Bourns trimmers were 
also installed to adjust DC offset and bias.


The one mod that we had to do was to install
emitter resistors for the new transistors. This 
would prevent the amp from going into thermal 
runaway.


New fuses in place.


The amp also got a full recap with Panasonic
capacitors. 


Complete


 Almost done. 


          The 3020 was finally reassembled and turned on. Initial test showed everything to be fine so the bias and DC offset were set and the amp was put through the paces. 


          We had not heard the amp before as it was not operational when it first came in so we did not have anyway of knowing how good it was going to sound. We were pleasantly surprised because for a 30 year old amp, it sounded tight. Bass was there, clarity and not too harsh. No hum from the speakers. There was power on tap as well as we really couldn't go past 10 o'clock with the volume knob. All in all, it actually sounded amazing, no wonder these amps were so highly regarded and are still being sought after today.