Showing posts with label Amplifier Repair. Show all posts

Wednesday, 19 March 2014

Roz Works Solutions

          We're back! Yes, we're still alive and kickin'! We're still making cables and repairing amplifiers and we've been busy, busy, busy!


          There have been some changes and some updates here and there, the biggest one namely is that we're now called Roz Works Solutions and we're renaming everything...including this blog soon. We have a new Facebook page with loads of pics with constant updates. Do give us a Like if you like what you see.


          What's the monkey up there for? Well, our cables are now also available at the Amplified Headphone Store at Jaya One in PJ. You can find them via the following:

Facebook Page

Online Shop

or their physical location at: 


          We're are also now accepting international orders (not that we haven't previously but we've had quite a few queries and a couple of sales to our neighbors in Singapore). There will be a new range of cables out sometime this year to go along with the whole new name but the old range will still be available for those who are interested. 


          That should about cover it...so go check out our Facebook page at:


          We'll still be updating the blog from time to time so check back, the contact form still works so you can either reach us with that or the old blackoctagon12@gmail.com email.


Till the next one! 


Wednesday, 2 October 2013

Repairs: Part 2 - Trade Repairs

          I wanted to talk a bit about trade repairs in this post and how things work around here (Malaysia) and possibly the rest of the world. We do repairs for the trade (re-sellers) and the process is quite simple; they give us a piece of equipment to repair and a budget to work with. Usually these items (equipment) come from one of a few sources:


Second-hand hi-fi galore

  • A customer sent it in to be repaired (these are the best as we aren't usually restricted with a budget and can do the best job possible)
  • A customer sent it in to be sold but the item is faulty and needs to be repaired cheaply so the customer and the re-seller make a healthy profit each.
  • They bought it cheap but there was a fault with it and they need it fixed for cheap before selling it on (these need to be done on a very small budget)
  • It was part of the re-seller's inventory and it developed a fault over time. (it has a set budget so they can make a decent profit selling it once its repaired)


Example

Pioneer SA-500 trade repair


          The amplifier above (a Pioneer SA-500) needed a full re-cap. We normally recommend a re-cap for amplifiers above 10-15 years of age. This Pioneer was over 30 years old and still had all of its original capacitors. The owner intended to sell it so they approached a re-seller in the hopes of getting a fast sale. Unfortunately the Pioneer had not been used in years and did not produce any sound when tested.


          This was where we came in. We checked the amplifier over, recommended a re-cap and a price was agreed upon. Initially we were told to only get the amplifier working and not bother with its phono stage as that would go slightly over budget. In the end we decided that the phono stage should be done as well as its a classic amp and chances are it will be used with a turntable. 


Re-Capped and ready to go


          I'm going to go slightly off topic for a moment to sing the praises of this little Pioneer. It pushes out 12W per channel but with a pair of efficient speakers, this small amp has a very big soundstage! Also this was right off the bat so the capacitors were brand new and had not yet settled in. Expecting it to get a lot better as its used. I was actually a bit disappointed to see it go once we had fixed it to be honest. 


          Well, the above amp is a classic example of a trade repair. The customer ended up getting to sell off a working amp instead of a dead one which meant a bigger sale amount. The re-seller stands a chance to make a bigger profit as well. And as for us...well, we're still waiting for the little amp to be sold as we still haven't gotten paid! Lol...till the next one!


Thursday, 19 September 2013

NAD 3020 Rebuild


The 3020 when it first showed up at our doorstep


          The classic (some would say legendary) NAD 3020. This particular example was bought second hand by the owner some time back and came with a few issues. Apparently it had no power LED and there was a slight hum from the speakers when in operation. Well, the hum grew into a massive hum and the owner finally decided to do something about it so he sent it to us.


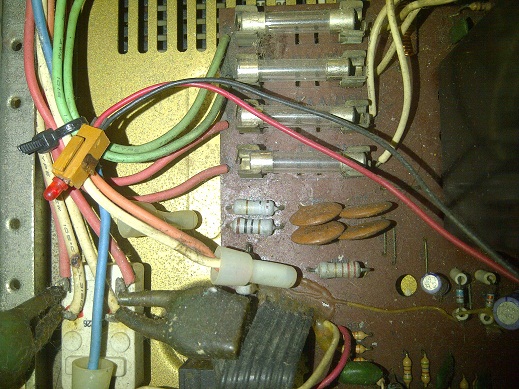
          A quick visual inspection of the inside showed that the power LED was still there but had become detached from the front panel. The main filter capacitors had been changed to some unbranded ones and the output transistors were also not original. Fuses had been changed to fast blow types instead of the original slow blow fuses. As for the rear of the NAD, besides a layer of dirt and crud, everything looked as it should.


These transistors would have worked in place 
of the  originals, the only problem was that we 
suspected that they were fake.


Fast blow fuses in place of slow blow ones. 
Power LED detached from front panel.


PCB tracks for the output transistors had
been previously damaged.


Tear down


 The 3020's board was removed from its chassis 
and given a good clean.


Output transistors were removed and their 
heatsink was removed for cleaning. All of the old
thermal paste was cleaned off so that the new 
transistors would seat perfectly.


 All switches were cleaned.


Pots were cleaned as well and all found to be 
functioning well.


Assembly


The main filter caps were replaced with 
Panasonic FC caps. New STMicroelectronics
transistors were seated with new thermal 
paste and mica insulators. Bourns trimmers were 
also installed to adjust DC offset and bias.


The one mod that we had to do was to install
emitter resistors for the new transistors. This 
would prevent the amp from going into thermal 
runaway.


New fuses in place.


The amp also got a full recap with Panasonic
capacitors. 


Complete


 Almost done. 


          The 3020 was finally reassembled and turned on. Initial test showed everything to be fine so the bias and DC offset were set and the amp was put through the paces. 


          We had not heard the amp before as it was not operational when it first came in so we did not have anyway of knowing how good it was going to sound. We were pleasantly surprised because for a 30 year old amp, it sounded tight. Bass was there, clarity and not too harsh. No hum from the speakers. There was power on tap as well as we really couldn't go past 10 o'clock with the volume knob. All in all, it actually sounded amazing, no wonder these amps were so highly regarded and are still being sought after today.